
A Practical Field Guide for Budget-Conscious Consumers & Home lab Enthusiasts
Eliminate dead zones with high-performance AX3000 mesh nodes at a fraction of the cost of a new mesh kit.Executive Summary: The “New Mesh” Tax
Consumer networking marketing has convinced millions of households that reliable, whole-home Wi-Fi requires dropping $300 to $600 on shiny three-pack retail kits (e.g., Eero 6+, Nest Wifi Pro, Netgear Orbi, or Asus ZenWiFi).
Yet under the hood, standard Wi-Fi 6 (802.11ax) silicon has matured significantly. Massive enterprise and consumer turnover—driven by carrier upgrades and upgrade-fever enthusiasts jumping to Wi-Fi 6E and Wi-Fi 7—has flooded secondary markets (eBay, Mercari, Facebook Marketplace, local surplus recyclers) with capable Wi-Fi 6 hardware at 70–80% off original MSRP.
By repurposing proven second-hand standalone Wi-Fi 6 routers that feature vendor mesh standards (specifically highlighting the Huawei WiFi AX3 Pro / WS7200), anyone can construct a carrier-grade multi-gigabit wireless mesh network covering 3,000–5,000+ sq ft for far less than a new mesh kit.

The Value Champion: Huawei AX3 Pro (WS7200)
The Huawei AX3 Pro (Model: WS7200) stands out as arguably the highest value-to-cost ratio piece of pre-owned hardware on the secondary market.
Originally launched as a flagship consumer router, it pairs true 160 MHz channel bandwidth with high-power RF front-end amplifiers (FEMs) and Huawei’s proprietary HarmonyOS Mesh+ / Link+ fast-roaming engine.
Key Specifications & Architecture

NOTE
Hardware Revisions to Watch For on eBay/Mercari:
- WS7200 (Black or White, “Pro” Quad-Core): Contains 4 independent high-power power amplifiers (FEMs) and the quad-core CPU. This is the prime unit to seek.
- WS7100 (Non-Pro AX3): Dual-core 1.2GHz, 2 amplifiers on 5GHz only. Cheaper ($15–$25), acceptable for minor satellite dead zones, but lower 2.4GHz range.
- WS7206 (AX3 Pro Refresh): Qualcomm dual-core IPQ5018 variant deployed during global chip shortages. Excellent stability and identical software experience.
- Chinese (CN) vs. Global (EU/UK/International) Versions: CN versions feature unrestricted RF power output (stronger signal penetration through drywall/brick) and NFC “Tap to Connect” on the corner. The setup UI can be translated automatically in any modern browser (Chrome/Edge/Brave) or switched via mobile app.
Cost Comparison: Pre-Owned DIY Mesh vs. Brand-New Kits

Sourcing & Pre-Flight Hardware Inspection
When acquiring used networking hardware from platforms like eBay, Mercari, ShopGoodwill, or Facebook Marketplace:
1. Buyer Checklist Before Bidding/Purchasing
- Power Supply Included: Verify the seller includes the original 12V / 1.5A or 12V / 2A DC barrel plug adapter. Underpowered generic 12V 0.5A power supplies cause intermittent packet drops and thermal reboots under high RF load.
- Confirm Model Code: Inspect the underside sticker for
WS7200orWS7206(Pro model) rather thanWS7100(standard model). - Port Condition: Ensure none of the 4 RJ-45 pins are bent or corroded.
2. Mandatory Day-One Factory Reset & Security Scrub
Before plugging any used node into your primary network:
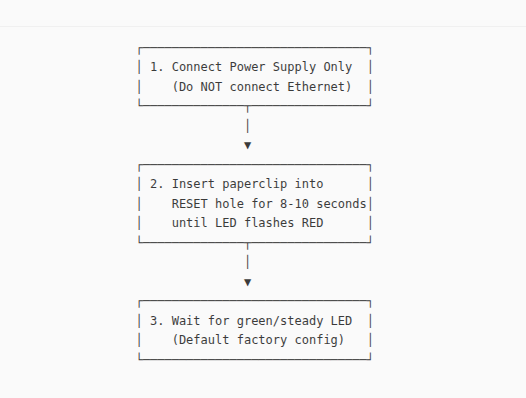
CAUTION
Never connect a second-hand router that has not been reset to factory defaults directly to your LAN. Rogue static IPs, leftover DHCP subnets (like 192.168.1.1 colliding with your primary gateway), or lingering custom DNS settings can disrupt your existing network topology.
Deployment Architectures: Two Ways to Deploy
Depending on whether you run a standalone ISP modem or a custom homelab firewall (pfSense, OPNsense, UniFi Dream Machine, MikroTik), choose your architecture:
Scenario A: Standalone Mesh (AX3 Pro Acts as Primary Router + DHCP)
Ideal for standard households replacing an ISP-provided combo unit.

- Node 1 (Master): Plug ISP modem into any port on the primary AX3 Pro (auto-detects as WAN). Complete the initial setup wizard to assign your Wi-Fi SSID and WPA2/WPA3 password.
- Nodes 2 & 3 (Satellites): Bring them within 2 meters of Node 1 during initial pairing. Press the H button on Node 1; the satellite’s LED will flash and sync within 60 seconds, adopting the master’s SSID, password, channel plan, and encryption settings automatically.
Scenario B: Homelab / Prosumer Bridge Mode (Access Point Mode)
Ideal for home lab hobbyists who demand advanced routing, VLAN segmentation, and custom DNS (Pi-hole / AdGuard Home) running on a dedicated firewall.
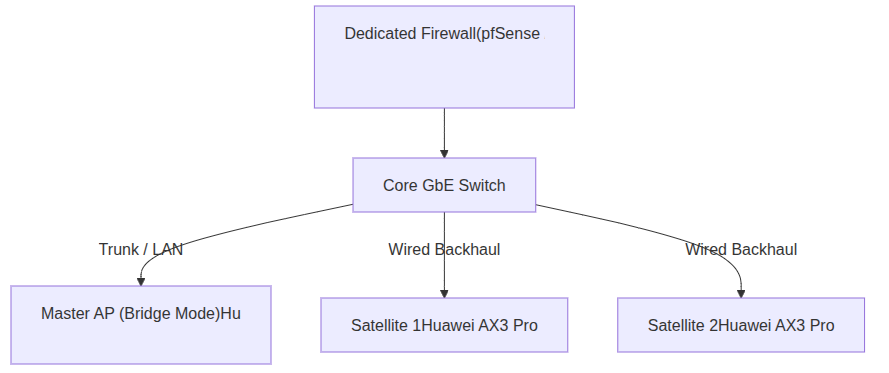
IMPORTANT
Preventing Double-NAT:
When operating behind pfSense or OPNsense, go to Network Settings -> Internet Settings -> Connection Type on the primary AX3 Pro and select Bridge (AP) mode.
In Bridge Mode:
- The AX3 Pro disables its internal DHCP server and NAT firewall.
- HarmonyOS Mesh+ and 802.11k/v fast-roaming remain 100% functional.
- All wireless clients receive IP addresses directly from your upstream homelab DHCP/VLAN server.
- All 4 ports on every node now operate as standard unmanaged gigabit switch ports.
Backhaul Engineering: Wired vs. Wireless Performance
1. Ethernet Backhaul (The Gold Standard)
Because the AX3 Pro has 4 auto-sensing gigabit ports on every node, you can cable them together through existing in-wall Cat5e/Cat6 wiring or an unmanaged switch.
- Latency: <1 ms node-to-node.
- Throughput: Symmetrical 940+ Mbps.
- Spectrum Efficiency: Both 2.4 GHz and 5 GHz bands remain completely free for client communication. No airtime is wasted on repeat backhaul traffic.
2. 5 GHz Wireless Backhaul (Overcoming No-Wire Limitations)
If running ethernet is impossible, the AX3 Pro uses dynamic 5GHz backhaul.
- To maximize speed, enable 160 MHz channel bandwidth in the wireless settings.
- At 160 MHz, the theoretical link rate between nodes reaches 2402 Mbps. Even taking 50% half-duplex retransmission overhead into account, real-world speeds on satellites consistently exceed 450–650 Mbps, comfortably saturating typical home internet connections.
TIP
Satellite Placement Rule of Thumb (Wireless Backhaul):
Never place the satellite node directly inside a Wi-Fi dead zone. Place it halfway between the master node and the dead zone where it still maintains at least a -65 dBm 5GHz signal link.
Step-by-Step Configuration & Performance Tuning Guide
Step 1: Initial Flash & Local Access
- Connect your PC via ethernet cable to any port on the primary node (or join the default open Wi-Fi network
HUAWEI-XXXXXX). - Navigate to
http://192.168.3.1in your browser. - If using a Chinese (CN) market unit, right-click anywhere on the page and select “Translate to English”. The visual layout is identical to the global firmware.
- Set the administrative password and create your unified SSID (e.g.,
HomeBase_WiFi6).
Step 2: Optimal Radio Settings for Low Latency & High Speed
Under My Wi-Fi / Wi-Fi Advanced Settings:

Step 3: Pairing Secondary Mesh Nodes
- Power on the secondary node in the same room. Wait for the front status LED to turn solid yellow/red.
- The primary node’s H button LED will begin pulsing slowly, indicating it has discovered an unconfigured mesh partner.
- Tap the H button once on the primary router (or click “Pair” in the web GUI under Link+ Topology).
- The secondary node’s LED will flash and turn Solid Green. It has cloned all configurations.
- Unplug the secondary node, relocate it to its destination room, and connect an Ethernet back-haul cable (optional, but encouraged).
Thermal Management & Long-Term Reliability
The quad-core Hi5651T processor and four power amplifiers in the AX3 Pro run warm (normal operating chassis temperatures sit around 40°C–48°C / 104°F–118°F).

- Use the Wall-Mount Slots or Vertical Stands: Standing the router vertically or elevating the rubber feet by 5–10 mm promotes bottom-to-top convection cooling through the side ventilation grilles, dropping internal SoC temps by 6°C–10°C.
- Firmware Updates: Always update to the latest available firmware release via the web interface. Firmware versions post-2022 include improved power states and dynamic duty-cycle throttling when the radios are idle.
Roaming Verification: Testing 802.11k/v Fast Transition
Once deployed, verify that seamless roaming functions correctly:
- Android: Use Wi-Fi Man (by Ubiquiti) or WiFi Analyzer. Walk between rooms while streaming video or running an active continuous ping (
ping 1.1.1.1). - iOS: Enable Apple’s Wi-Fi Diagnostics profile or use the Airport Utility Wi-Fi Scanner.
- Target Metrics:
- Roaming transition time should take under 40 milliseconds.
- No dropped packets during continuous ICMP pings.
- Device RSSI should transition cleanly at roughly -70 dBm from Node A to Node B.
Summary: The Pre-Owned Homelab Advantage
Building a mesh network does not require paying luxury retail prices. By taking advantage of high-spec, pre-owned Wi-Fi 6 hardware like the Huawei AX3 Pro (WS7200):
- You save 75%+ over retail kits with zero compromise in throughput or 160MHz radio capability.
- You eliminate dead zones using real hardware power amplifiers rather than low-power integrated pods.
- You gain home-lab-ready modularity, deploying in pure Bridged AP mode behind custom firewalls with abundant gigabit Ethernet switch ports in every room.